- Let users sign up and log in using a username and password or a Google account.
- Authenticate and authorize users using OAuth 2.0 and OpenID Connect.
- Let users use specific tools based on their roles.
Pre-requisites
Auth for MCP is currently available in Early Access. To join the Early Access program, please complete this form. We’ll reach out to you when your request is processed.
1. Create or log in to your Auth0 Account
1. Create or log in to your Auth0 Account
To continue with this quickstart, you need to have an Auth0 account.
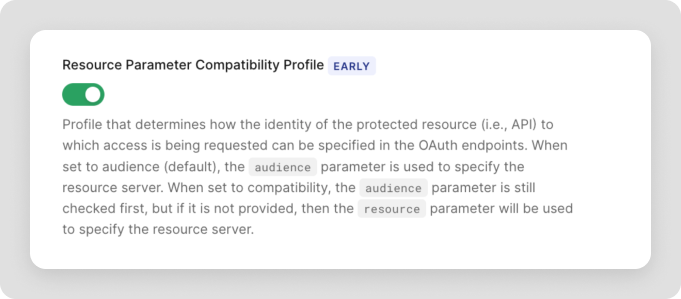
2. Enable your Tenant to use the Resource Parameter Compatibility Profile
2. Enable your Tenant to use the Resource Parameter Compatibility Profile
To use the 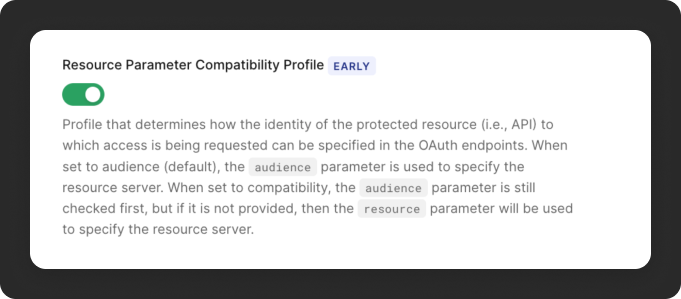
 Resource Parameter Compatibility Profile is available under the Early Access program. Go to the Early Access section to learn how to gain access.
resource parameter in your access tokens, you need to enable the compatibility profile.The quickest way to enable it is through the Auth0 Dashboard:- Navigate to Settings on the left sidebar.
- Click on Advanced on the top right corner.
- Scroll down to the Settings section, find and enable Resource Parameter Compatibility Profile.
3. Install the Auth0 CLI
3. Install the Auth0 CLI
This guide uses Auth0 CLI to configure an Auth0 tenant for secure MCP tool access.Confirm you are in the correct tenant by double-checking on the terminal the tenant domain, or run the command below:If more than one tenant is configured, the default tenant will be indicated by an arrow.
- Follow the Auth0 CLI installation instructions.
- Log in to your account with the Auth0 CLI:
4. Install jq
4. Install jq
To simplify the process of interacting with the Auth0 CLI, we recommend installing jq. This will allow you to easily parse JSON responses from the CLI.
- MacOS
- Linux
- Windows
Configure tenant settings
1. Promote the Connection to domain-level
1. Promote the Connection to domain-level
To allow third-party clients like MCP inspector to use a connection like username-and-password or a social connection, you need to promote the connection to a domain level. Learn more about enabling third-party applications.
1
List your connection
List your connections to get their IDs
2
Choose your connections
From the list, identify which connections you want to use for the MCP server and copy the ID.
- For the username and password database, look for the connection with the strategy
auth0. - For Google social connection, look for the connection with the strategy
google-oauth2.
3
Upgrade the connection to domain-level
For each of those specific connection IDs, run the following command to mark it as a domain-level connection. Replace
YOUR_CONNECTION_ID with the actual ID (e.g., con_XXXXXXXXXXXXXXXX)2. Add roles and permissions (optional)
2. Add roles and permissions (optional)
The sample application in this quickstart is prepared to show different tools depending on the role of a given user. For example an Tool Administrator will have access to different tools from an Tool User.If your application doesn’t require that level of access, i.e. all users have access to available tools, this step is not required for your use case.Let’s create roles that allow you to control which users can access which tools.Save the ID from the output (they start with Copy the user ID (
If you decide to skip this step, you’ll only have access to the tool
get_current_time, which is the only tool in the sample apps that doesn’t require any permissions.Create roles
For each role you need (e.g., “Tool Administrator”, “Tool User”), run the create command as below.rol_) as you’ll need them for the next step.Assign permissions to roles
After creating roles, assign the API permissions to it:Assign roles to users
Find users and assign them to the roles. You can search by their email address:USERID) from last command’s output then assign the role to the user:Create an API to represent your MCP server
An MCP server is treated just like any other API in your Auth0 tenant, which means you can use the same access control, scoping, and authorization features. The API (also known as a Resource Server) represents your protected MCP Server. Run the following command to create an API in Auth0:rfc9068_profile_authz is used as the token dialect to include the permissions claim in the access token, which can be useful for the API to check user permissions without making additional calls.
For more details on protecting APIs with Auth0 check our quickstarts.
- Use sample app (recommended)
- Clone GitHub repository
Start by downloading the sample app for this quickstart. The sample includes a FastMCP MCP server with an Auth0 integration in JavaScript.Once downloaded, extract the files and open the project in your preferred IDE.
Install packages
Ensure you have npm installed or follow the instructions to install npm in its documentation. In thefastmcp-mcp-js directory, install the required packages:
Create your environment file
In thefastmcp-mcp-js directory, create a new .env file and add the following content:
AUTH0_DOMAIN, run the following command:
TENANT from the output and update the corresponding variable on the .env.
Run your MCP server
Run this command to start your server:Testing your MCP server
Now that your MCP server is up and running, you can test it by using tools like MCP Inspector.Learn how to test your Auth0 powered MCP server
Next steps
- To set up first-party tool calling, complete the Call Your APIs on User’s Behalf quickstart.